
Mapping Kashmir shawl designs from antique fabrics
The design or motif displayed on a kani-woven fabric is the result of the conversion of a drawing into precise digital instructions that correspond to the weaver’s way of working. As a tapestryweaver in a different tradition, I knew the information I needed was the colour and the extent traveled by each weft in succession across the width. I have always had a strong sense of the grid structure of plain-weave tapestry, as well as weaving in general. In tapestry it is a matter of getting the right colour of weft in each location in the grid, to display the design and to hold together as a piece of cloth.
The structure of kani weaving is known as 2/2 twill, with a repeatable weave-unit of 4 weft picks across 4 warp ends. At each treadling the warps are displayed two-up-two-down; the two-up are called a “nal” (pair), and passing under the number of nals is the distance the weft crosses, to be exchanged for the next weft of a different colour. The weaver is working from the back side of the fabric, so one nal appears on the front as a stitch of colour crossing over 2 warps. At the next treadling, the raised nals all shift one warp to the left (as seen on the fabric front), developing into a noticeable line rising up at a 45 degree angle toward the left, that I will call the twill “grain”, like the grain seen in a piece of wood.
A simple question that dogged me for years was: For how many picks of weaving is the same line of instructions followed? …at every pick, every two picks, or all 4 picks that complete one weave-unit? As I have argued elsewhere, the answer is changing, and not in a good way.
The thing to look for in old fabrics is that those stitches corresponding to each nal usually appear in twos or multiples of two, following the line of the twill grain (because it is the next treadling for the same line of instructions). The modern practice would show up as rows or groups of 4 stitches, because the same instructions are repeated in 4 picks. Either way, it would be correct to draft the design on a brick grid – for the modern example, pairs of talim lines would be exactly the same. Each row of brick-grid units represents 2 picks of weaving, and each brick is one nal.
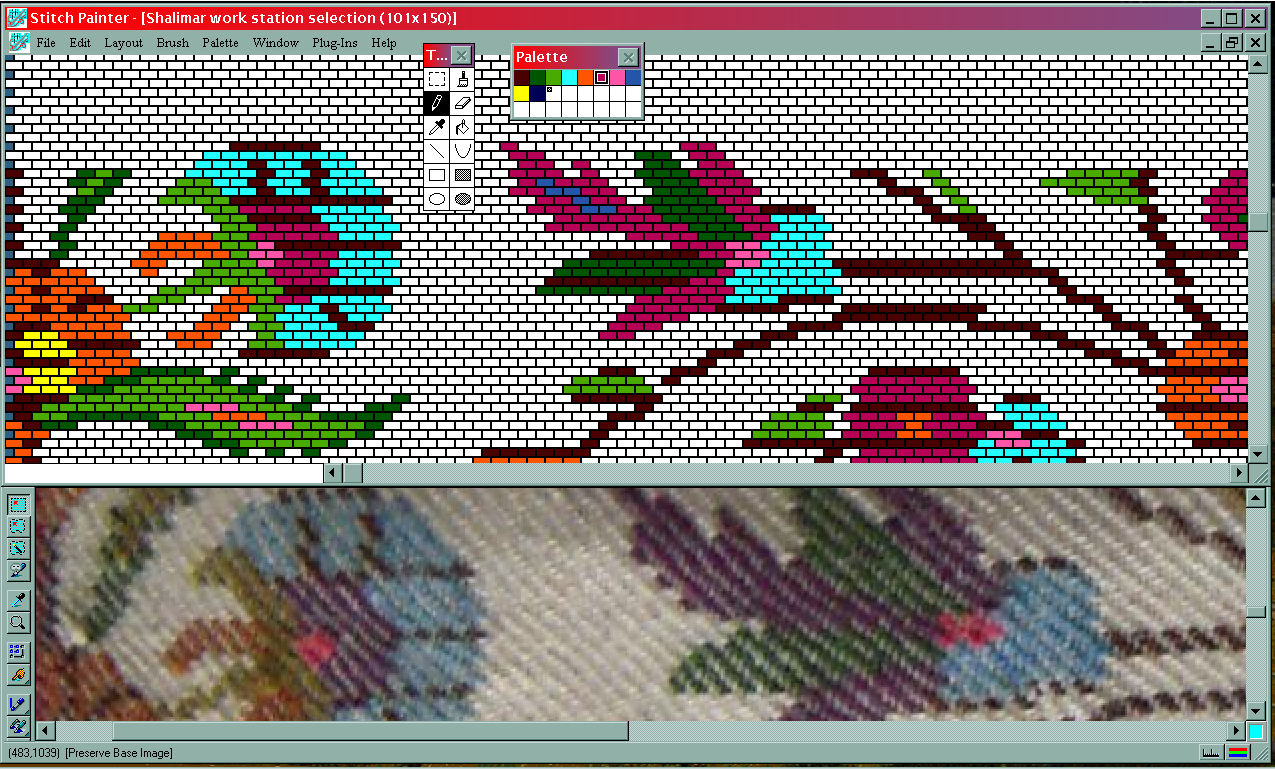
To look at the antique fabric, I am fortunate if I can start with a best-possible close-up photograph – carefully lighted and lined up on an improvised copy-stand – loaded into my image-editing program, where I can conveniently view it at magnifications up to 10x, the screen width of the fabric photo in nals. Careful lighting will help to distinguish colours, and sharp focus to settle questions. Printed photographs are rarely good enough.
Stitch Painter allows a continuous-tone image to be copied and pasted onto the grid, reducing it to a chosen number of colours. How much handwork this saves depends on the alignment of the fabric, the quality of the photograph, and a careful estimation of the matching numbers of rows and nals of the grid. Ultimately the degree of precision expected of row-by-row, step-by-step, interlocking instructions will require every detail to be checked by hand and eye.
To begin, I prepare a blank brick-grid document with provisional dimensions of the expected number of nals in width and twice as many rows to cover the same extent lengthwise. Each brick-grid unit is one-half the height (representing 2 picks), compared to its width because it is spanning 4 warps (the 2 which were raised and the 2 which were not). Then I’ll make a selection of colours similar to the original fabric but easy to distinguish from each other. My completely self-contained work station on-screen shows enough of the grid to work on and enough of the fabric photo to compare it with. A good place to start would be anywhere the threads appear orderly: the warps not skewed, the wefts not undulating, the twill grain running straight, threads of uniform thickness, and other design details nearby to connect to.

Look for straight lines in the design on the fabric: for straight warp-wise lines or edges that follow the same warp threads, the next weft that interacts the same way with the same warp threads is represented by the next brick in the design aligned above, which is in the second row above ( “A” in the photo). Straight horizontal or weft-wise lines are represented by several brick-grid units in the same row (“B”). Straight design lines that follow the twill grain rising to the left (“C”) are very useful – they may be visualized as bricks each overlapping the one below it by half, and counted at the rate of two stitches for each row of bricks. Counting and learning to estimate the number of stitches in these lines in the twill grain is important, and it is where all the resources of a sharp image, highly magnified, and the skill or experience to see it in brick-grid arrangement, come into play.
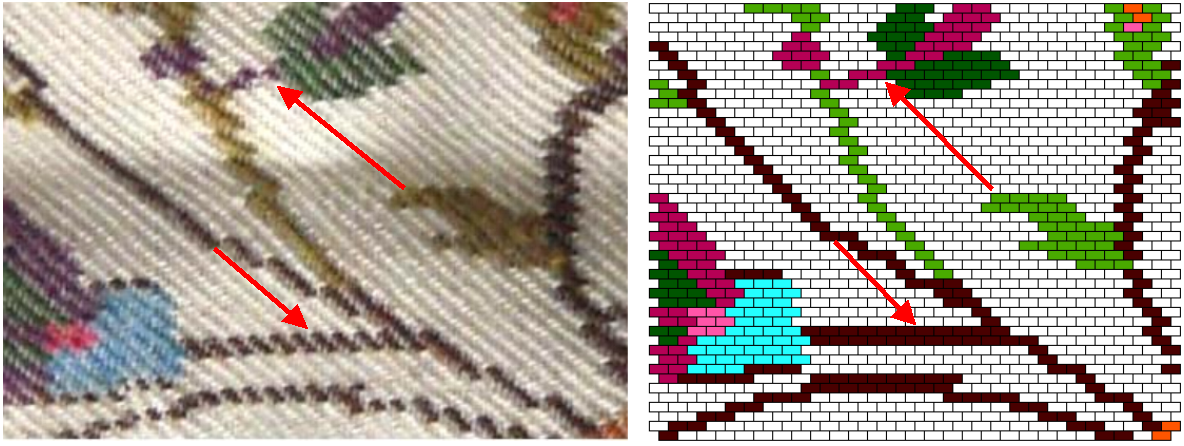
Locating design details is generally a question of extending straight lines and counting beyond known details from two or more directions, especially along the twill grain, to see where they meet. It’s a mixture of counting, estimating, and judgements about which stitches are in a straight line.
Sometimes it’s obvious that the weft threads are not the same thickness. Single-ply and two-ply wefts may be used, depending on the weaver’s stocks of the colours needed. Accents of strong colours such as black may be thinner for outlining, although their weaving-in follows the same instructions as other wefts. When the fabric is washed, or flexed and used, thick and thin threads will expand and collapse, making straight weft-wise lines hard to follow.
As these treasured and delicate fabrics were worn seasonally for many years, they were subject to many kinds of damage and pains-taking repair. No matter how skilled and “invisible” the mending and matching of repairs, on the thread-by-thread scale of analysing the design, repairs are very disruptive.
I have always enjoyed the comparison between tapestryweaving and assembling a jigsaw puzzle. That description is even more appropriate here, as I tend to assemble portions of the design by building outwards in any direction from portions already settled. Mostly these are filled in brick-by-brick, but occasionally as gaps diminish and conflicts arise, whole portions may need to be shifted slightly, or erased and rebuilt from another direction. Occasionally, in the midst of what seems like randomly deciding a brick here or there, I get the chance to follow around the outline of a clearly-defined shape that can be broken down like the two-part move of a knight in chess: so many rows of bricks diagonally, then so many double rows vertically, so many horizontally, and down vertically, until I arrive back exactly at my starting point. Or if not, why not? Sessions that end with being stuck, usually resolve when starting fresh.
Logically, if the process is known, then what varies in the fabric must be according to those digital instructions. If I had work experience as a kani weaver, I would be better able to appreciate the design modifications introduced by the weaver, especially after dozens of repetitions of the same motif, in rows or consecutively in side-borders. The talim system priviledged the designer over the weaver, and the original design over subsequent modifications. Any changes in scale or orientation of the motif required a complete new talim text. Comparing repeats of the same motif to determine what is the same is reassuring, when you find that it is exactly the same arrangement of stitches, even if it looks a little pinched or twisted because of variations in the yarns.
Details displayed in this post are from a fabric woven at the School of Designs in Srinagar, Kashmir, from an existing set of talim re-assembled by the author, with revisions by the weaver I discovered through this process.

